Oct 05, 2023
0 comment
Ideas for water in your garden
We take a closer look at the SubAqua Show Garden from the 2023 Show with David Hurrion, and have some great ways to include water in your own garden from BBC Gardeners’ World Magazine.
Garden water elements elevate the appeal of any outdoor space by offering decorative charm, creating a tranquil ambiance, and fostering a habitat for various wildlife.Incorporating a water feature into your garden doesn’t have to be a costly endeavor. Even something as uncomplicated as an appealing garden water bowl can have a substantial effect, as it catches and reflects sunlight alongside nearby plants. You can produce serene trickling sounds with a streamlet or fountain, and a pond can enable you to cultivate aquatic flora while also serving as a residence for newts, frogs, and dragonflies.
/*! elementor - v3.19.0 - 07-02-2024 */
.elementor-widget-video .elementor-widget-container{overflow:hidden;transform:translateZ(0)}.elementor-widget-video .elementor-wrapper{aspect-ratio:var(--video-aspect-ratio)}.elementor-widget-video .elementor-wrapper iframe,.elementor-widget-video .elementor-wrapper video{height:100%;width:100%;display:flex;border:none;background-color:#000}@supports not (aspect-ratio:1/1){.elementor-widget-video .elementor-wrapper{position:relative;overflow:hidden;height:0;padding-bottom:calc(100% / var(--video-aspect-ratio))}.elementor-widget-video .elementor-wrapper iframe,.elementor-widget-video .elementor-wrapper video{position:absolute;top:0;right:0;bottom:0;left:0}}.elementor-widget-video .elementor-open-inline .elementor-custom-embed-image-overlay{position:absolute;top:0;right:0;bottom:0;left:0;background-size:cover;background-position:50%}.elementor-widget-video .elementor-custom-embed-image-overlay{cursor:pointer;text-align:center}.elementor-widget-video .elementor-custom-embed-image-overlay:hover .elementor-custom-embed-play i{opacity:1}.elementor-widget-video .elementor-custom-embed-image-overlay img{display:block;width:100%;aspect-ratio:var(--video-aspect-ratio);-o-object-fit:cover;object-fit:cover;-o-object-position:center center;object-position:center center}@supports not (aspect-ratio:1/1){.elementor-widget-video .elementor-custom-embed-image-overlay{position:relative;overflow:hidden;height:0;padding-bottom:calc(100% / var(--video-aspect-ratio))}.elementor-widget-video .elementor-custom-embed-image-overlay img{position:absolute;top:0;right:0;bottom:0;left:0}}.elementor-widget-video .e-hosted-video .elementor-video{-o-object-fit:cover;object-fit:cover}.e-con-inner>.elementor-widget-video,.e-con>.elementor-widget-video{width:var(--container-widget-width);--flex-grow:var(--container-widget-flex-grow)}
Water rills
Water rills are shallow conduits that facilitate the movement of water from one location to another, offering a continuous and peaceful auditory backdrop that can complement any garden.
/*! elementor - v3.19.0 - 07-02-2024 */
.elementor-widget-image{text-align:center}.elementor-widget-image a{display:inline-block}.elementor-widget-image a img[src$=".svg"]{width:48px}.elementor-widget-image img{vertical-align:middle;display:inline-block}
Ponds
A garden pond is versatile and adaptable, fitting seamlessly into gardens of all sizes and design aesthetics. Whether you prefer a biodiverse haven teeming with plants or a serene, minimalistic pool with clean, straight edges, a pond offers endless possibilities. You can enhance its ambiance by incorporating bubbling sounds through the use of fountains or rills.
Water pouring jugs
Pouring jug water features have a romantic, classical feel to them. Purpose-made jugs with a hole for the pump to discreetly slot into are easy to find and they can be either be free-standing features that pour into a bowl, or used as a starting point for rills, pouring into a pond or even a swimming pool. Plant around the jug to integrate it in your overall design.
Pebble piles
Pebble piles are one of the simplest and cheapest to set up. A pile of artfully placed stones and pebbles conceal a pump and water reservoir beneath. You can use a similar set up with a millstone – a pump hidden in the central hole of the millstone will radiate water out, and if needed, can be concealed by a heap of pebbles.
Fountains
Fountains are ideal if you have an area that’s in need of a focal point. There are lots of different styles to choose from, including polished metal spheres and stone monoliths and columns.
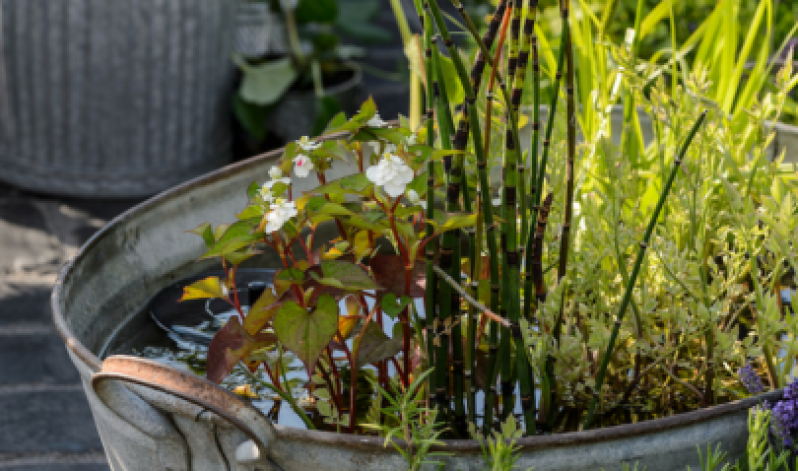
Troughs and tanks
Watertight troughs and containers can be filled with water to create interesting unique features. This upcycled metal trough has a bed of grey pebbles to precent the water looking too dark and murky, while colourful planting softens the hard edges.
Take a look at the gallery below to get inspiration from the water features seen at our previous Shows…
/*! elementor-pro - v3.19.0 - 07-02-2024 */
.elementor-gallery__container{min-height:1px}.elementor-gallery-item{position:relative;overflow:hidden;display:block;text-decoration:none;border:solid var(--image-border-width) var(--image-border-color);border-radius:var(--image-border-radius)}.elementor-gallery-item__content,.elementor-gallery-item__overlay{height:100%;width:100%;position:absolute;top:0;left:0}.elementor-gallery-item__overlay{mix-blend-mode:var(--overlay-mix-blend-mode);transition-duration:var(--overlay-transition-duration);transition-property:mix-blend-mode,transform,opacity,background-color}.elementor-gallery-item__image.e-gallery-image{transition-duration:var(--image-transition-duration);transition-property:filter,transform}.elementor-gallery-item__content{display:flex;flex-direction:column;justify-content:var(--content-justify-content,center);align-items:center;text-align:var(--content-text-align);padding:var(--content-padding)}.elementor-gallery-item__content>div{transition-duration:var(--content-transition-duration)}.elementor-gallery-item__content.elementor-gallery--sequenced-animation>div:nth-child(2){transition-delay:calc(var(--content-transition-delay) / 3)}.elementor-gallery-item__content.elementor-gallery--sequenced-animation>div:nth-child(3){transition-delay:calc(var(--content-transition-delay) / 3 * 2)}.elementor-gallery-item__content.elementor-gallery--sequenced-animation>div:nth-child(4){transition-delay:calc(var(--content-transition-delay) / 3 * 3)}.elementor-gallery-item__description{color:var(--description-text-color,#fff);width:100%}.elementor-gallery-item__title{color:var(--title-text-color,#fff);font-weight:700;width:100%}.elementor-gallery__titles-container{display:flex;flex-wrap:wrap;justify-content:var(--titles-container-justify-content,center);margin-bottom:20px}.elementor-gallery__titles-container:not(.e--pointer-framed) .elementor-item:after,.elementor-gallery__titles-container:not(.e--pointer-framed) .elementor-item:before{background-color:var(--galleries-pointer-bg-color-hover)}.elementor-gallery__titles-container:not(.e--pointer-framed) .elementor-item.elementor-item-active:after,.elementor-gallery__titles-container:not(.e--pointer-framed) .elementor-item.elementor-item-active:before{background-color:var(--galleries-pointer-bg-color-active)}.elementor-gallery__titles-container.e--pointer-framed .elementor-item:before{border-color:var(--galleries-pointer-bg-color-hover);border-width:var(--galleries-pointer-border-width)}.elementor-gallery__titles-container.e--pointer-framed .elementor-item:after{border-color:var(--galleries-pointer-bg-color-hover)}.elementor-gallery__titles-container.e--pointer-framed .elementor-item.elementor-item-active:after,.elementor-gallery__titles-container.e--pointer-framed .elementor-item.elementor-item-active:before{border-color:var(--galleries-pointer-bg-color-active)}.elementor-gallery__titles-container.e--pointer-framed.e--animation-draw .elementor-item:before{border-left-width:var(--galleries-pointer-border-width);border-bottom-width:var(--galleries-pointer-border-width);border-right-width:0;border-top-width:0}.elementor-gallery__titles-container.e--pointer-framed.e--animation-draw .elementor-item:after{border-left-width:0;border-bottom-width:0;border-right-width:var(--galleries-pointer-border-width);border-top-width:var(--galleries-pointer-border-width)}.elementor-gallery__titles-container.e--pointer-framed.e--animation-corners .elementor-item:before{border-left-width:var(--galleries-pointer-border-width);border-bottom-width:0;border-right-width:0;border-top-width:var(--galleries-pointer-border-width)}.elementor-gallery__titles-container.e--pointer-framed.e--animation-corners .elementor-item:after{border-left-width:0;border-bottom-width:var(--galleries-pointer-border-width);border-right-width:var(--galleries-pointer-border-width);border-top-width:0}.elementor-gallery__titles-container .e--pointer-double-line .elementor-item:after,.elementor-gallery__titles-container .e--pointer-double-line .elementor-item:before,.elementor-gallery__titles-container .e--pointer-overline .elementor-item:before,.elementor-gallery__titles-container .e--pointer-underline .elementor-item:after{height:var(--galleries-pointer-border-width)}.elementor-gallery-title{--space-between:10px;cursor:pointer;color:#6d7882;font-weight:500;position:relative;padding:7px 14px;transition:all .3s}.elementor-gallery-title--active{color:#495157}.elementor-gallery-title:not(:last-child){margin-right:var(--space-between)}.elementor-gallery-item__title+.elementor-gallery-item__description{margin-top:var(--description-margin-top)}.e-gallery-item.elementor-gallery-item{transition-property:all}.e-gallery-item.elementor-animated-content .elementor-animated-item--enter-from-bottom,.e-gallery-item.elementor-animated-content .elementor-animated-item--enter-from-left,.e-gallery-item.elementor-animated-content .elementor-animated-item--enter-from-right,.e-gallery-item.elementor-animated-content .elementor-animated-item--enter-from-top,.e-gallery-item:focus .elementor-gallery__item-overlay-bg,.e-gallery-item:focus .elementor-gallery__item-overlay-content,.e-gallery-item:focus .elementor-gallery__item-overlay-content__description,.e-gallery-item:focus .elementor-gallery__item-overlay-content__title,.e-gallery-item:hover .elementor-gallery__item-overlay-bg,.e-gallery-item:hover .elementor-gallery__item-overlay-content,.e-gallery-item:hover .elementor-gallery__item-overlay-content__description,.e-gallery-item:hover .elementor-gallery__item-overlay-content__title{opacity:1}a.elementor-item.elementor-gallery-title{color:var(--galleries-title-color-normal)}a.elementor-item.elementor-gallery-title.elementor-item-active,a.elementor-item.elementor-gallery-title.highlighted,a.elementor-item.elementor-gallery-title:focus,a.elementor-item.elementor-gallery-title:hover{color:var(--galleries-title-color-hover)}a.elementor-item.elementor-gallery-title.elementor-item-active{color:var(--gallery-title-color-active)}.e-con-inner>.elementor-widget-gallery,.e-con>.elementor-widget-gallery{width:var(--container-widget-width);--flex-grow:var(--container-widget-flex-grow)}